Tutorial: Going round in circles with animals
By far, my illustration which has attracted the most attention on the #illo52weeks challenge page is my entry for Week 23: Zoo.
I found out, by chance, that the twitter logo is made from 13 circles, so I thought I would try some animal shapes - but leave the circles in the illustration. It started as a bit of fun and an experimental challenge.

So here is a tutorial, or at least a guide (I'm writing my intro before I have formed a plan....).
I explained on the challenge page that this might be tricky because a tutorial tends to be linear and, just like the illustrations themselves, my creative and thought processes were far from linear. In fact, I'm not sure how much thought was actually involved.
Here we go:
1 - Open a new photoshop file and call it 'Circle animals' (or whatever works for you)
2 - You will need to be able to create an unfilled circle in photoshop. I obviously made one - you can see that, but honestly it was more luck than judgement, so I shall refer you to an expert. Try THIS LINK on Youtube.
3 - If you have got this far - well done :) Now copy the circle so that you have 13, all in different layers. They should automatically be handily named layer 1 to layer 13.
4 - If you want to make more than one animal, do what I didn't do, and make a copy of these lovely complete circles which all have the same line width.
* I suggest making a group of these layers (call it 'animal circles 1')
* duplicate the group (call it 'original circles') make it invisible and keep it tucked away at the bottom of your layers.
5 - At last we are ready to think about making an animal out of these circles.
* Choose a photo of you favourite animal and add it as a layer to your photoshop file; I used a mixture of my own photos from zoo trips, and... well... I am sure you can find your own sources.
* I kept my photo relatively small, with the animal itself filling about 1/3 or 1/2 of the image size so that I would have lots of circle lines showing as a feature.
6 - A little more tweaking of layers is needed now:
* Add a new layer to provide a background, give it a solid fill, layer it near the bottom, just above the 'original circles' group.
* Order the animal photo layer under the 'animal circles 1' group.
7 - It's time to look at your animal photo. You have to ask yourself some questions here:
* Which parts of the animal are the most important in identifying the essence of what makes it recognisable? What are the main body shapes? What do you HAVE to include and what isn't important?

8 - Think (don't DO anything yet) about how you can best use your small number of lines / circles
* Start with the largest bits of body mass
* Look at where a large circle can help define two or more unrelated body lines - maybe a shoulder and a back leg or a tail.
* Straighter lines need really large circles
* There will be very few times one circle will work on its own to define a body part.
* Thin shapes, like tails, will need very large circles which barely intersect
* Feet etc can be defined with one sweeping arc across all of them
* A single small circle can be a spot, or the tip of a tail.
8 - Where to start?
* I started with main body shapes first - hips, belly, shoulders.
* Then any identifying features: tails, ears, legs.
9 - You are now ready start moving your circles around.
* Go to the 'Animal circles 1' group.
* make layers 2 - 13 invisible
* make layer 1 your active layer
* use the marquee tool to select it and use 'free transform' (windows: control+T) to move it, using the photo as a guide. If you try to stick too closely to the photo you will get very frustrated.
* if you want to change the diameter of the circle, hold the shift key down to retain its shape - it's all about the circles, not ellipses.
10 - When the first circle is in place, make layer 2 visible: rinse and repeat, gradually making more of the circles visible and moving them into place.

11 - When you have used about half your circles, stop and reassess where you are, and make adjustments as necessary.
* Are the circles being used efficiently? Are any now unnecessary? (Often the first, seemingly important circles can be re-used more effectively elsewhere).
* Are the circles intersecting or sitting inside each other in a visually pleasing way?
12 - When you have used all your circles, duplicate the group, then merge the new group and call the resulting layer: 'Animal 1 colour', make this your active layer.
* use the magic wand tool and bucket fill tool to select and fill areas with colours of your choice. I used the colour picker tool to use colours from the source photo.

13 - Now for your finishing touches:
* Hide your animal photo layer
* Review your image. Adjust the colours if you need to, and be honest with yourself: if any of the shapes look odd at this point, delete this layer and go back to your circles group to make the changes. Then go back to step 12.

14 - Smile and save your work.
15 - Duplicate your 'original circles' group, hide all the other layers and start all over again with a different animal.
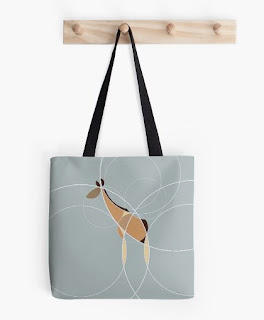
Here is my design on a series of tote bags in my RedBubble store


I found out, by chance, that the twitter logo is made from 13 circles, so I thought I would try some animal shapes - but leave the circles in the illustration. It started as a bit of fun and an experimental challenge.

So here is a tutorial, or at least a guide (I'm writing my intro before I have formed a plan....).
I explained on the challenge page that this might be tricky because a tutorial tends to be linear and, just like the illustrations themselves, my creative and thought processes were far from linear. In fact, I'm not sure how much thought was actually involved.
Here we go:
1 - Open a new photoshop file and call it 'Circle animals' (or whatever works for you)
2 - You will need to be able to create an unfilled circle in photoshop. I obviously made one - you can see that, but honestly it was more luck than judgement, so I shall refer you to an expert. Try THIS LINK on Youtube.
3 - If you have got this far - well done :) Now copy the circle so that you have 13, all in different layers. They should automatically be handily named layer 1 to layer 13.
4 - If you want to make more than one animal, do what I didn't do, and make a copy of these lovely complete circles which all have the same line width.
* I suggest making a group of these layers (call it 'animal circles 1')
* duplicate the group (call it 'original circles') make it invisible and keep it tucked away at the bottom of your layers.
5 - At last we are ready to think about making an animal out of these circles.
* Choose a photo of you favourite animal and add it as a layer to your photoshop file; I used a mixture of my own photos from zoo trips, and... well... I am sure you can find your own sources.
* I kept my photo relatively small, with the animal itself filling about 1/3 or 1/2 of the image size so that I would have lots of circle lines showing as a feature.
* Add a new layer to provide a background, give it a solid fill, layer it near the bottom, just above the 'original circles' group.
* Order the animal photo layer under the 'animal circles 1' group.
7 - It's time to look at your animal photo. You have to ask yourself some questions here:
* Which parts of the animal are the most important in identifying the essence of what makes it recognisable? What are the main body shapes? What do you HAVE to include and what isn't important?

8 - Think (don't DO anything yet) about how you can best use your small number of lines / circles
* Start with the largest bits of body mass
* Look at where a large circle can help define two or more unrelated body lines - maybe a shoulder and a back leg or a tail.
* Straighter lines need really large circles
* There will be very few times one circle will work on its own to define a body part.
* Thin shapes, like tails, will need very large circles which barely intersect
* Feet etc can be defined with one sweeping arc across all of them
* A single small circle can be a spot, or the tip of a tail.
8 - Where to start?
* I started with main body shapes first - hips, belly, shoulders.
* Then any identifying features: tails, ears, legs.
9 - You are now ready start moving your circles around.
* Go to the 'Animal circles 1' group.
* make layers 2 - 13 invisible
* make layer 1 your active layer
* use the marquee tool to select it and use 'free transform' (windows: control+T) to move it, using the photo as a guide. If you try to stick too closely to the photo you will get very frustrated.
* if you want to change the diameter of the circle, hold the shift key down to retain its shape - it's all about the circles, not ellipses.
10 - When the first circle is in place, make layer 2 visible: rinse and repeat, gradually making more of the circles visible and moving them into place.

11 - When you have used about half your circles, stop and reassess where you are, and make adjustments as necessary.
* Are the circles being used efficiently? Are any now unnecessary? (Often the first, seemingly important circles can be re-used more effectively elsewhere).
* Are the circles intersecting or sitting inside each other in a visually pleasing way?
12 - When you have used all your circles, duplicate the group, then merge the new group and call the resulting layer: 'Animal 1 colour', make this your active layer.
* use the magic wand tool and bucket fill tool to select and fill areas with colours of your choice. I used the colour picker tool to use colours from the source photo.

13 - Now for your finishing touches:
* Hide your animal photo layer
* Review your image. Adjust the colours if you need to, and be honest with yourself: if any of the shapes look odd at this point, delete this layer and go back to your circles group to make the changes. Then go back to step 12.

14 - Smile and save your work.
15 - Duplicate your 'original circles' group, hide all the other layers and start all over again with a different animal.
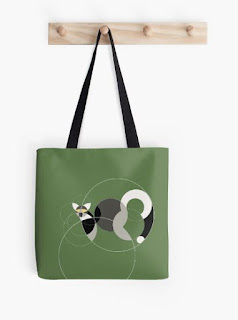
Here is my design on a series of tote bags in my RedBubble store


Comments
Post a Comment